Tutorials
- Discovering examples
- Building compact discrete domains
- Introduction to input file
- Plugins and input files
- Initialize project
- Initialize your first custom plugin (You are here)
- Implement your first custom plugin
- Run your first project
- granoo-viewer usage
- Inputs/Outputs with GranOO
- Building a very simple tensile test
- Using numerical sensor
This page describes how to create a custom plugin
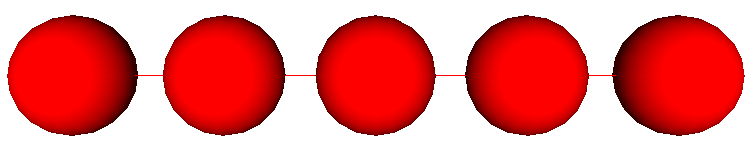
This tutorial shows how to build a simple discrete domain thanks to a custom plugin. As shown on the following picture, the discrete domain is composed by discrete elements aligned along a straight line. Note that discrete elements are bonded together. The domain is defined by :
- the length between the center of the first and the center of the last discrete element,
- the radius of discrete elements and
- the number of discrete elements.
Prerequisites
You must follow the previous tutorial steps before starting this tutorial. You must build a new blank project and you are currently located in the folder of this new project.
Building a new plugin
The granoo3-project tool can be used to build a new plugin. The following line invokes
the granoo3-project tool and creates a new plugin in the current directory named BuildDomain.
:prompt: granoo3-project -p --cpp
Adding a new plugin...
PlugIn Name ? -> BuildDomain
Do you want comments ? [(y)es or (n)o] -> y
-  Adding "PlugIn_BuildDomain.cpp" file to the current dir
-  Adding "PlugIn_BuildDomain.hpp" file to the current dir
-> Good bye !
Now, your current directory must look like this.
.
├── build
├── CMakeLists.txt
├── Main.cpp
├── my-project.inp
├── PlugIn_BuildDomain.cpp
└── PlugIn_BuildDomain.hpp
You can observe that two new C++ files named PlugIn_BuildDomain.cpp
and PlugIn_BuildDomain.hpp that were added to your current directory. These files
correspond to the minimal code of a granoo plugin. Now, you have
to edit these two files in order to customize this plugin.
:prompt: granoo3-project -p --py
Adding a new plugin...
PlugIn Name ? -> BuildDomain
Do you want comments ? [(y)es or (n)o] -> y
-  Adding "PlugIn_BuildDomain.py" file to the current dir
 - Some lines were added to your 'Main.py' file
-> Good bye !
Now, your current directory must look like this.
.
├── Main.py
├── my-project.inp
└── PlugIn_BuildDomain.py
You can observe a new python file named PlugIn_BuildDomain.py
that were added to your current directory. This file corresponds to the minimal code
of a granoo plugin. Now, you have to edit this file in order to customize
this plugin.
Overview of a plugin structure
The PlugIn_BuildDomain.hpp that contains the C++ declaration of your plugin looks like :
#ifndef _PlugIn_BuildDomain_hpp_
#define _PlugIn_BuildDomain_hpp_

#include <string>
#include "GranOO3/Common.hpp"
#include "GranOO3/libUtil/PlugIn.hpp"
#include "GranOO3/libUtil/Util.hpp"


class PlugIn_BuildDomain : public Core::PlugInInterface<PlugIn_BuildDomain>
{

public:
  DECLARE_CUSTOM_GRANOO_PLUGIN(BuildDomain); // a macro for declaring the plugin

  PlugIn_BuildDomain();                      // constructor
  ~PlugIn_BuildDomain();                     // destructor

  void parse_xml();
  void init();
  void run();

private:
  std::string message_;
};

#endif
You can notice that the structure of a granoo plugin is simple. A granoo plugin must inherit
from the Util::PlugInInterface<T> class. In addition of common constructor and destructor
a granoo plugin must implement three methods :
-
void parse_xml(), this method is invoked when the xml input file is parsed. This stage is the preliminary stage of a granoo computation. You can use this method to read some attributes from the xml input files. -
void run()this method is ran each time the plugin must be launched. To keep it simple, you have to put here what your plugin must do. -
init(), this method is invoked just one time, before the first run of therun(self)method. You can use it if you want to initialize some attributes of your plugin.
The PlugIn_BuildDomain.py that contains minimal python code of your plugin looks like :
import granoo3.lib as granoo

class PlugIn_BuildDomain(granoo.plugin):

    def __init__(self):
        granoo.plugin.__init__(self, "BuildDomain")

    def run(self):
        # run your plugin here
        print "hello from python, your message is", self.message


    def init(self):
        # do something here, useful to initialize your data
        pass


    def read(self):
        # read data from xml input file
        r = granoo.reader.get()
        self.message = r.read_str(granoo.attr.REQUIRED, "Message")
You can notice that the structure of a granoo plugin is simple. A granoo plugin must inherit
from the granoo.plugin super class. A granoo plugin must implement three methods :
-
read(self), this method is invoked when the xml input file is parsed. This stage is the preliminary stage of a granoo computation. You can use this method to read some attributes from the xml input files. -
run(self)this method is run each time the plugin must be launched. To keep it simple, you have to put here what you plugin must do. -
init(self), this method is invoked one time, just before the first run of therun(self)method. You can use it if you want to initialize some attributes of your plugin.
Important ! You must instantiate your python plugin in order to launch it.
The granoo-project tool automatically add two lines to your Main.py file
to instantiate your plugin. Your Main.py file must look like :
import granoo3.lib as granoo
import sys

import PlugIn_BuildDomain # added by granoo-project : import your plugin
p = BuildDomain()         # added by granoo-project : instantiate your plugin

if __name__ == "__main__":
    # run the granoo computation
    granoo.problem.get().run(sys.argv)