Tutorials
- Discovering examples
- Building compact discrete domains
- Introduction to input file
- Plugins and input files
- Initialize project
- Initialize your first custom plugin
- Implement your first custom plugin (You are here)
- Run your first project
- granoo-viewer usage
- Inputs/Outputs with GranOO
- Building a very simple tensile test
- Using numerical sensor
This page describes how to implement a custom plugin
Prerequisites
You must follow the previous tutorial steps before starting this tutorial.
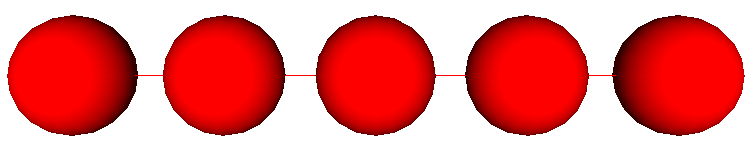
You must have a new project with the required plugin source
files. Remember that we want to build this domain.
Adding attributes to plugin
We want to create three new attributes :
length_that corresponds to the length of the domain,radius_that corresponds to the radii of the discrete elements,number_that corresponds to the number of discrete element.
In C++ and object oriented programming, a common usage it to keep attributes private.
So, we can introduce these attributes in the private part of the plugin.
Now, the PlugIn_BuildDomain.hpp looks like :
#ifndef _PlugIn_BuildDomain_hpp_
#define _PlugIn_BuildDomain_hpp_

#include <string>
#include "GranOO3/Common.hpp"
#include "GranOO3/libUtil/PlugIn.hpp"
#include "GranOO3/libUtil/Util.hpp"


class PlugIn_BuildDomain : public Core::PlugInInterface<PlugIn_BuildDomain>
{
public:
  DECLARE_CUSTOM_GRANOO_PLUGIN(BuildDomain);

  PlugIn_BuildDomain();
  ~PlugIn_BuildDomain();

  void parse_xml();
  void init();
  void run();

private:
  double length_ = 0.;
  double radius_ = 0.;
  unsigned int number_ = 0.;
};

#endif
Note that, for C++11, you can directly initialize variable in the class declaration.
To introduce these attributes in the plugin we implement the __init__(self) method of the
PlugIn_BuildDomain.py file.
import granoo3.lib as granoo

class PlugIn_BuildDomain(granoo.plugin):

    def __init__(self):
        granoo.plugin.__init__(self, "BuildDomain")
        self.length_ = 0.
        self.radius_ = 0.
        self.number_ = 0.

    def run(self):
        pass

    def init(self):
        pass

    def read(self):
        pass
Implementing the constructor and destructor
The constructor and destructor do nothing, they must look like :
PlugIn_BuildDomain ::PlugIn_BuildDomain()
  : Core::PlugInInterface<PlugIn_BuildDomain>() {
}

// PlugIn destructor
PlugIn_BuildDomain ::~PlugIn_BuildDomain(){
}
Reading attribute values from input file
Here, we want to read the length_, radius_ and number_ values from input file.
You can find below the corresponding implementation. You can implement the ParseXml() method
for C++ or the read(self) method for Python.
void
PlugIn_BuildDomain ::parse_xml() {
  Core::XmlParser& parser = Core::XmlParser::get();
  parser.read_attribute(Attr::GRANOO_REQUIRED, "Length", length_);
  parser.read_attribute(Attr::GRANOO_REQUIRED, "Radius", radius_);
  parser.read_attribute(Attr::GRANOO_REQUIRED, "Number", number_);
}
Here, we use the read_attribute() method that comes from the Core::XmlParser class where :
- the first parameter tells if the attribute is required or not. You can use
Attr::GRANOO_OPTIONALif you want to an optional attribute. - the second attribute corresponds to the name of the attribute inside the input file.
- the third attribute is your variable, where the value will be stored.
class PlugIn_BuildDomain(granoo.plugin):

    def __init__(self):
        granoo.plugin.__init__(self, "BuildDomain")
        self.length_ = 0.
        self.radius_ = 0.
        self.number_ = 0.

    def run(self):
        pass

    def init(self):
        pass

    def read(self):
        # read data from xml input file
        r = granoo.reader.get()
        self.length_ = r.read_float(granoo.attr.REQUIRED, "Length")
        self.radius_ = r.read_float(granoo.attr.REQUIRED, "Radius")
        self.number_ = r.read_int  (granoo.attr.REQUIRED, "Number")
Here, we use the read_float(...) and read_int(...) methods that comes from the
singleton reader class where :
- the first parameter tells if the attribute is required or not. You can use
granoo.attr.OPTIONALif you want to tell that an attribute is not required. - the second attribute corresponds to the name of the attribute inside the input file.
This syntax corresponds to the following line inside your input file.
<BuildDomain Length="1" Radius="0.1" Number="10"/>Note that the input file reader is really powerful. Types are checked. The following line raises an error :
<BuildDomain Length="bggj" Radius="0.1" Number="10"/>Required attributes are also checked. The following line raises an error because
the Length attribute is not present.
<BuildDomain Radius="0.1" Number="10"/>and unknown attributes are also checked. The following line raises an error because
the Toto attribute is unknown.
<BuildDomain Length="1" Radius="0.1" Number="10" Toto="54"/>Implementing the Run() method
Now, you have to implement the Run() method. This method will create
several discrete elements and link them through a special class named
DEM::ElementPair. The first discrete element (at the left) is registered
in a special array Core::SetOf<DEM::DiscreteElement> named "right"
and the last discrete element (at the right) is registered in a array
named "left".
void
PlugIn_BuildDomain ::run() {
  // Show message
  granoo::cout << "Build simple domain with parameters" << '\n'
	       << " - length    : " << length_ << " m" << '\n'
	       << " - de number : " << number_ << '\n'
	       << " - de radius : " << radius_ << " m" << granoo::endl;

  // Build discrete elements
  const double density = 1000.;
  const double step = length_/double(number_ - 1);
  for (unsigned int i = 0; i < number_; ++i) {
    Geom::Point p(step*i, 0., 0.);
    new DEM::DiscreteElement(p, radius_, density);
  }

  // Get the global discrete element set
  // The global set is a special array that contains all the discrete element
  Core::SetOf<DEM::DiscreteElement>& globalSet = Core::SetOf<DEM::DiscreteElement>::get();


  // Build element pair that link two discrete elements
  for (unsigned int i = 0; i < globalSet.Size() - 1; ++i) {
    DEM::DiscreteElement& de1 = globalSet(i);
    DEM::DiscreteElement& de2 = globalSet(i+1);
    new DEM::ElementPair(de1, de2);
  }

  // Create new SetOf named 'right' and 'left'
  Core::SetOf<DEM::DiscreteElement>* rightSet = new Core::SetOf<DEM::DiscreteElement>("right");
  Core::SetOf<DEM::DiscreteElement>* leftSet  = new Core::SetOf<DEM::DiscreteElement>("left");

  // Add the first discrete element to the 'right' SetOf
  DEM::DiscreteElement& firstDE = globalSet.first();
  rightSet->add(firstDE);

  // Add the last discrete element to the 'right' SetOf
  DEM::DiscreteElement& lastDE  = globalSet.last();
  leftSet->add(lastDE);
}
Step by step description of the Run() method
The following code block simply uses the granoo::cout function that mimics
the terminal ouptut of the standard C++ library. It allows to display nice
message to the user. Here, the main parameters of the wanted domain are summarized.
 granoo::cout << "Build simple domain with parameters" << '\n'
	    << " - length    : " << length_ << " m" << '\n'
	    << " - de number : " << number_ << '\n'
	    << " - de radius : " << radius_ << " m" << granoo::endl;
The following code block creates new discrete elements. A loop is used here to create the required number of discrete elements. Building a new discrete element requires the following parameters:
- its center that is defined by a geometrical point in the 3D space,
- its density and,
- its radius.
Note the use of the Geom::Point class. It defines the initial position of the discrete element center.
  // Build discrete elements
  const double density = 1000.;
  const double step = length_/double(number_ - 1);
  for (unsigned int i = 0; i < number_; ++i) {
    Geom::Point p(step*i, 0., 0.);
    new DEM::DiscreteElement(p, radius_, density);
  }
The following code block parses the “global discrete element set” and creates ElementPair instances
between discrete elements. The global set is a special instance of the Core::SetOf<T> class.
This instance can be accessed through the static method get(). The global set is unique and
contains all the discrete elements of the domain. You can access to an item indexed by a Core::SetOf<T>
through the parenthesis operator ().
Later, these ElementPair will be used to implement mechanical
bonds between discrete elements.
  // Build element pair that link two discrete elements
  for (unsigned int i = 0; i < globalSet.Size() - 1; ++i) {
    DEM::DiscreteElement& de1 = globalSet(i);
    DEM::DiscreteElement& de2 = globalSet(i+1);
    new DEM::ElementPair(de1, de2);
  }
The following code block builds a new empty Core::SetOf<T>. Note that each Core::SetOf<T> is identified
with a unique string. The first discrete element is caught thanks to the globalSet variable
(created in the previous source block). The first discrete element is added to the “left” Core::SetOf<T>.
The same procedure is applied with the last discrete element and the “right” Core::SetOf<T>.
Later, these Core::SetOf<T> will be used to apply some loads and boundary conditions to the
discrete elements indexed by these Core::SetOf<T>.
Note that Core::SetOf is a very important feature of granoo. It allows to mark some elements.
The Core::SetOf<T> classes mimic std::vector<T> arrays with extended features such as automatic registering and unregistering, smart parsing, identification with unique id, bilateral message….
  // Create new SetOf named 'right' and 'left'
  Core::SetOf<DEM::DiscreteElement>* rightSet = new Core::SetOf<DEM::DiscreteElement>("right");
  Core::SetOf<DEM::DiscreteElement>* leftSet  = new Core::SetOf<DEM::DiscreteElement>("left");

  // Add the first discrete element to the 'right' SetOf
  DEM::DiscreteElement& firstDE = globalSet.first();
  rightSet->add(firstDE);

  // Add the last discrete element to the 'right' SetOf
  DEM::DiscreteElement& lastDE  = globalSet.last();
  leftSet->add(lastDE);
Implementing the run(self) method
Now, you have to implement the run(self) method. This method will create
several discrete elements and link them through a special class named
element_pair. The first discrete element (at the left) is registered
in a discrete_element_set named "right" and the last discrete
element (at the right) is registered in a discrete_element_set named "left".
def run(self):
    # store new items in array
    self.de_list   = []
    self.pair_list = []

    # show messages
    granoo.cout("Build simple domain with parameters")
    granoo.cout(" - length    : " + str(self.length_))
    granoo.cout(" - de number : " + str(self.number_))
    granoo.cout(" - de radius : " + str(self.radius_))

    # build discrete elements
    density = 1000.
    step = self.length_/float(self.number_ - 1)
    for i in range(self.number_):
        p = granoo.point(step*i, 0., 0.)
        self.de_list.append(granoo.discrete_element(p, self.radius_, density))

    # get the global discrete element set
    # a global set is a special array that contains all the discrete element
    globalSet = granoo.discrete_element_set.glob()

    # create new element_pair between discrete elements
    for i in range(globalSet.size() -1):
        de1 = globalSet[i]
        de2 = globalSet[i+1]
        self.pair_list.append(granoo.element_pair(de1, de2))

    # create new SetOf named 'right' and 'left'
    self.rightSet = granoo.discrete_element_set("right")
    self.leftSet  = granoo.discrete_element_set("left")

    # add the first discrete element to the 'right' SetOf
    firstDE = globalSet.first()
    self.rightSet.add(firstDE)

    # add the last discrete element to the 'right' SetOf
    lastDE  = globalSet.last()
    self.leftSet.add(lastDE)
Step by step description of the run() method
The following code block simply uses the granoo.cout function that mimics the terminal ouptut of
the standard python library. It allows to display nice message to the user.
Here, the main parameters of the wanted domain are summarized.
# show messages
    granoo.cout("Build simple domain with parameters")
    granoo.cout(" - length    : " + str(self.length_))
    granoo.cout(" - de number : " + str(self.number_))
    granoo.cout(" - de radius : " + str(self.radius_))
The following code block creates new discrete_element. A loop is used here
to create the required number of discrete elements. Building a new discrete element
requires the following parameters:
- its center that is defined by a
pointin the 3D space, - its density and,
- its radius.
Note that the new discrete elements must be added to the self.de_list in order
to avoid automatic object deletion.
    # build discrete elements
    density = 1000.
    step = self.length_/float(self.number_ - 1)
    for i in range(self.number_):
        p = granoo.point(step*i, 0., 0.)
        self.de_list.append(granoo.discrete_element(p, self.radius_, density))
The following code block parses the global discrete_element_set and creates element_pair instances
between discrete elements. The global set is a special instance of the discrete_element_set class.
This instance can be accessed through the static method glob(). The global set is unique and
contains all the discrete elements of the domain.
Later, these element_pair will be used
to implement mechanical bonds between discrete elements. Note that the xxxx_set class instances
can be parsed as standard python list.
    # create new element_pair between discrete elements
    for i in range(globalSet.size() -1):
        de1 = globalSet[i]
        de2 = globalSet[i+1]
        self.pair_list.append(granoo.element_pair(de1, de2))
The following code block builds a new empty discrete_element_set.
Note that each xxxxx_set instances are identified with a unique string identifier.
The first discrete element is caught thanks to the globalSet variable
(created in the previous source block). The first discrete element is added to the
“left” discrete_element_set.
The same procedure is applied with the last discrete element and the “right”
discrete_element_set. Later, these discrete_element_set will be used to
apply some loads and boundary conditions to the
discrete elements indexed by these discrete_element_set.
Note that xxxxx_set is a very important feature of granoo. It allows to mark some elements.
The xxxxx_set classes mimic standard list arrays with extended features such as automatic
registering and unregistering, smart parsing, identification with unique id, bilateral message….
    # create new SetOf named 'right' and 'left'
    self.rightSet = granoo.discrete_element_set("right")
    self.leftSet  = granoo.discrete_element_set("left")

    # add the first discrete element to the 'right' SetOf
    firstDE = globalSet.first()
    self.rightSet.add(firstDE)

    # add the last discrete element to the 'right' SetOf
    lastDE  = globalSet.last()
    self.leftSet.add(lastDE)
Navigating through the granoo C++ API
In order to full exploit the power of plugin, you must have a good knowledge of the GranOO C++ API. You can get a quick tour of the granoo C++ API in the documentation section of this website.